Manage GitOps Applications
You can manage your applications through the Applications found in GitOps Overview page.
New Applications
Create a new application by click +New Application in the top right. To learn more about creating applications, go to Add a Harness GitOps Application
Application Operations
Applications are displayed on this page as a series of tiles. You can change this to a list of rows in the top right.
Each application will display various helpful information such as the application repository or a name and link to the GitOps Agent.
Each tile will have 3 vertical dots. Clicking this will allow you to manually Sync, Refresh, or Delete the application.
See the following to learn more about some of these operations:
Filter Applications
At the top you can filter your applications using a search bar and application attributes.
Create and Save Filters
You can also create and save custom filters so that you can make sure you're only looking at relevant applications consistently.
This feature is currently behind the feature flag GITOPS_FILTER_PANE_ENABLED. To enable this feature, contact Harness Support
To create and save a filter, do the following:
- Create a filter by doing any of the following:
- Add a custom search term
- Choose to filter by Agents, Sync Status, Health Status, etc.
- Add an additional filter field by clicking the +Add Filter button.
- Click Save
- Enter a name for the filter, and choose if you want it visible to Only me or Everyone in the scope.
Then you're done!
You can then load the filter each subsequent time by clicking the filter icon to the right of Reset and searching for your filter there.
Application Management Dashboard
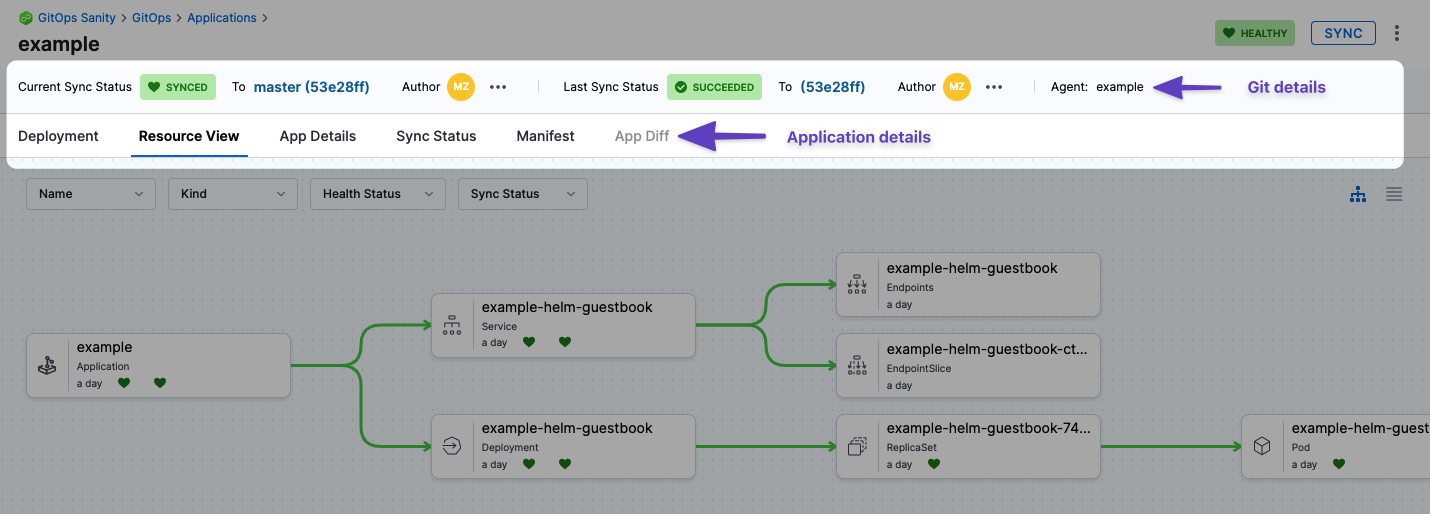
After you select an application, you will see the application dashboard:
-
Git details: you can see the Git commit used as the source for the sync. Clicking the commit Ids opens the commit in the source provider.
-
Deployment: the deployments dashboard shows when the Application was deployed (synced).
-
Resource View: displays the desired to target state mapping of each Kubernetes object. The Resource View lets you inspect the live target infrastructure by:
- Name: Kubernetes object names.
- Kind: Kubernetes object types.
- Health Status: the health status of the Application. For example, is it syncing correctly (Healthy)?
- Sync Status: sort Kubernetes objects by their sync status.
Select any item to see:
- Overview: An overview of the resources properties, such as name, namespace, or sync status.
- Events: Any events emitted by the pod.
- Logs: The logs of the resource. These logs are searchable, copyable, and downloadable. You can also view the log tail by clicking on the down arrow in the bottom right corner (click image below).

- Manifest: The manifest of the resource.
- Diff: The diff between the source manifest and application if they are out of sync.
-
App Details: displays the settings of the Application. You can edit the settings and apply your changes, including the Sync Options & Policy.
-
Sync Status: displays all of the sync operations performed by the Application.
-
Manifest: displays the manifest of the Application. This is not the same as the source manifest in the Git source repo.
You can edit the manifest in Manifest and the changes are synced in the target infrastructure, but when you do a full sync from your source repo the state of the source repo overwrites any changes made in Manifest. -
App Diff: displays a diff against the live state in the cluster and desired state in Git.
Application Configuration Options
Ignore HPA Changes to Prevent Out-of-Sync Status
When Horizontal Pod Autoscaler (HPA) is enabled, pod scaling can cause GitOps to detect unwanted differences and mark applications as out of sync.
To prevent this, configure the following in the application to ignore differences on replicas:
ignoreDifferences:
    - group: apps
      kind: Deployment
      jsonPointers:
        - /spec/replicas
    - group: apps
      kind: StatefulSet
      jsonPointers:
        - /spec/replicas
syncPolicy:
  syncOptions:
  - RespectIgnoreDifferences=true
Alternatively, you can add the following to the Argo ConfigMap:
apiVersion: v1
kind: ConfigMap
metadata:
  name: argocd-cm
data:
  resource.customizations: |
    apps/Deployment:^(app-with-hpa|hpa-enabled-.*|.*-autoscaled)$:
      ignoreDifferences: |
        jsonPointers:
        - /spec/replicas
For more details, see: